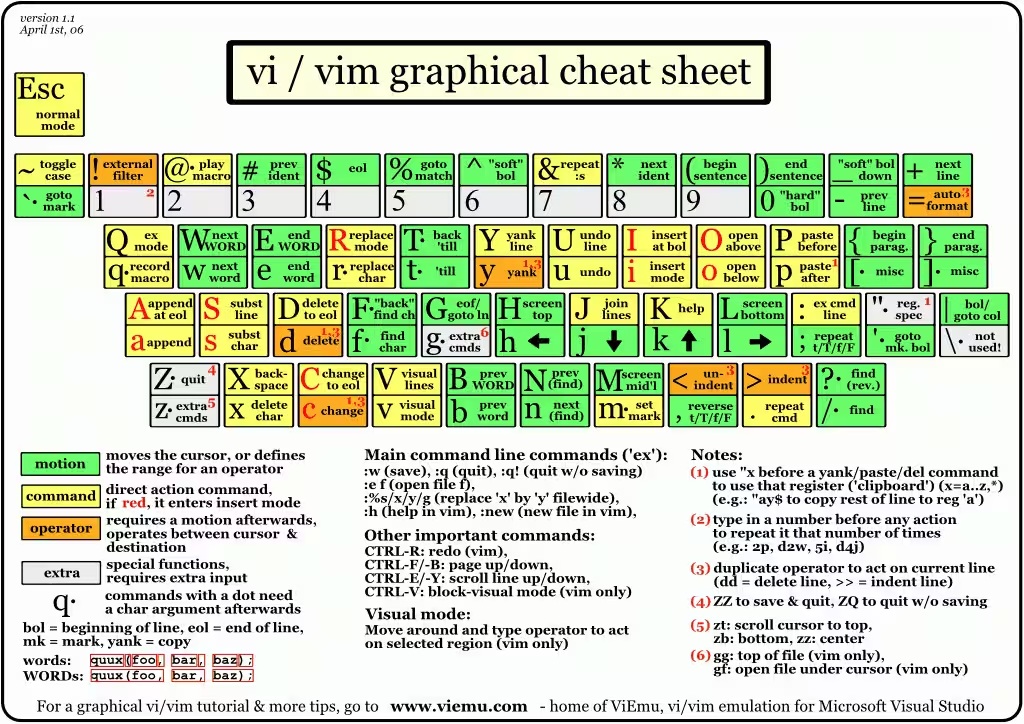
Vim Cheat Sheet
Modes:
Vi has two basic working modes: Insert and Normal (command) mode. It starts in Normal mode, where you move the cursor, delete and copy text. Insert and change commands enter Insert mode. Escape returns to Normal mode, where you can quit, for example with :q!. Most commands run as soon as you type them; commands beginning with a colon run after Enter.
Quitting:
:wq |
Save and quit |
:q |
Quit if there are no unsaved changes |
ZZ |
Save if modified, then quit |
:q! |
Quit and discard unsaved changes |
Inserting text:
i |
Insert before the cursor |
I |
Insert before the first nonblank character of the line |
a |
Append after the cursor |
A |
Append at the end of the line |
o |
Open a new line below the current line |
O |
Open a new line above the current line |
r |
Replace one character |
R |
Enter Replace mode |
Movement:
h |
Move left |
j |
Move down |
k |
Move up |
l |
Move right |
w |
Move to the next word |
W |
Move to the next whitespace-delimited WORD |
b |
Move back to the start of a word |
B |
Move back to the start of a whitespace-delimited WORD |
e |
Move to the end of a word |
E |
Move to the end of a whitespace-delimited WORD |
( |
Move back one sentence |
) |
Move forward one sentence |
{ |
Move back one paragraph |
} |
Move forward one paragraph |
0 |
Move to the start of the line |
$ |
Move to the end of the line |
1G |
Move to the first line of the file |
G |
Move to the last line of the file |
nG |
Move to line n of the file |
:n |
Move to line n of the file |
fc |
Move forward to character c |
Fc |
Move backward to character c |
H |
Move to the top of the screen |
M |
Move to the middle of the screen |
L |
Move to the bottom of the screen |
% |
Move to the matching bracket: ( ), { }, [ ] |
Deleting text:
Most deletion commands consist of d followed by a motion. For example, dw deletes a word. Other deletion commands include:
x |
Delete the character under the cursor |
X |
Delete the character before the cursor |
D |
Delete to the end of the line |
dd |
Delete the current line |
:d |
Delete the current line |
Yanking text:
Like deletion commands, most yank commands consist of y followed by a motion. For example, y$ copies text to the end of the line into a register. Two other yank commands are:
yy |
Yank the current line |
:y |
Yank the current line |
Changing text:
Change commands delete text and enter Insert mode. They consist of c followed by a motion. For example, cw changes a word. Other change commands include:
C |
Change to the end of the line |
cc |
Change the whole line |
Putting text:
p |
Put after the cursor or below the line |
P |
Put before the cursor or above the line |
Registers:
You can specify a named register before any delete, change, yank or put command. The prefix is "c, where c is a lowercase letter. For example, "adw deletes a word into register a. The command "ap puts it back into the text.
Marks:
You can set named marks at positions in the file. Lowercase letters name local marks. Marks can also define the boundaries of a range.
mc |
Set mark c. |
`c |
Jump to the exact position of mark c. |
'c |
Jump to the first nonblank character on the line containing mark c. |
Searching:
/string |
Search forward for string |
?string |
Search backward for string |
n |
Repeat the search in the same direction for string |
N |
Repeat the search in the opposite direction for string |
Substitution:
Search and replacement use :s, usually with a range or with :g (see below).
:s/pattern/string/flags |
Replace pattern with string according to flags. |
g |
Replace every match on each line. |
c |
Ask for confirmation before each replacement. |
& |
Repeat the last :s command. |
Regular expressions:
. (dot) |
Any single character except a newline. |
* |
Zero or more repetitions of the preceding atom. |
[...] |
One character from the set. |
[^...] |
One character not in the set. |
^ |
Start of a line. |
$ |
End of a line. |
< |
Start of a word. |
> |
End of a word. |
(…) |
A group, used to combine parts of an expression. |
n |
Contents of group n. |
[...] examples of character sets:
[A-Z] |
Uppercase letters A through Z. |
[a-z] |
Lowercase letters a through z. |
[0-9] |
Digits 0 through 9. |
[./=+] |
A set containing . (dot), / (slash), = and +. |
[-A-F] |
Uppercase letters A through F and a hyphen; put the hyphen first. |
[0-9 A-Z] |
All uppercase letters, digits and a space. |
[A-Z][a-zA-Z] |
The first position contains an uppercase letter A through Z. The second position contains any Latin letter. |
Regular expression examples:
/Hello/ |
Matches a line containing Hello. |
/^TEST$/ |
Matches a line containing only TEST. |
/^[a-zA-Z]/ |
Matches a line beginning with a Latin letter. |
/^[a-z].*/ |
Matches a line beginning with a-z, followed by zero or more characters. |
/2134$/ |
Matches a line ending with 2134. |
/\(21\|35\)/ |
Matches a line containing 21 or 35. Escaped parentheses group the alternatives; the escaped vertical bar means “or” in Vim's default pattern syntax. |
/[0-9]*/ |
Matches zero or more digits. |
/^[^#]/ |
Matches a line whose first character is not #. |
Notes:
1. Regular expressions are case-sensitive by default. 2. Regular expressions are used wherever a pattern is required: pattern.
Counts:
A number before a command specifies how many times to repeat it. For example, 5dw deletes five words, and 3fe moves forward to the third occurrence of e. Even an insertion can be repeated this way, for example to insert the same text 100 times.
Ranges:
A range before many colon commands specifies the lines to process. For example, :3,7d deletes lines 3 through 7. Combine ranges with :s to replace text on multiple lines; :.,$s/pattern/string/g replaces from the current line to the end of the file.
:n,m |
Lines n-m |
:. |
Current line. |
:$ |
Last line. |
:'c |
Mark c |
:% |
All lines in the file. |
:g/pattern/ |
All lines containing pattern. |
Files
:w file |
Write to file. |
:r file |
Read from file. |
:n |
Go to the next file. |
:prev |
Go to the previous file. |
:e file |
Edit file |
!!program |
Replace the line with output from program. |
Other commands
~ |
Toggle letter case. |
J |
Join lines. |
. |
Repeat the last text change. |
u |
Undo the last change. |
U |
Undo all changes on the line. |
Introduction
The reference above gives a first look at modes. Let's examine how they work and what you can do in each one.
Types of mode
Vim has three main editing modes:
- Normal mode runs commands. This is the mode Vim starts in.
- Insert mode lets you type text.
- Visual mode selects a region of text for a command or operation.
Normal mode and help
You start in Normal mode. Type :echo "hello world" and press Enter. Vim displays the familiar words “hello world”: you ran the :echo command and supplied the text to display. Now type /hello and press Enter. Vim searches for that text and moves to the next match.
Those are just two of the commands available in Normal mode; there are many more to explore. Knowing how to use :help is almost as important as understanding Normal mode itself. You do not have to memorise every Vim command, only know where to find it when you need it.
:help usr_toc opens the user manual's table of contents. :help index opens the command index, where you can search for a topic, for example with /insert mode. If you forget both names, press F1 or enter :help.
Entering and inserting text
Vim starts in Normal mode, and i switches to Insert mode. Let's try this and the other ways to enter text:
- Run
:e dapping.txt. - Press
i. - Type the following text, including its omissions; we will fix them shortly:
means being determined about being determined and being passionate about being passionate. - Press Escape to return to Normal mode.
- Run
:w.
We have missed a word at the beginning, while the cursor is at the end. How should we get back and insert it? We could use the mouse, press the arrow keys repeatedly, or press Home and then i. A more direct way is I, uppercase i:
- Press
I. - Type
Dappin. - Press Escape.
This Insert command first moves to the first nonblank character of the line. Get into the habit of returning to Normal mode as soon as you finish typing. After the initial writing, much of your work consists of rewriting, editing and polishing, which is where Normal mode is useful.
The command i inserts before the character under the cursor. To insert after it, use a, for “after”:
- Press
a. - Type
g, including the space, to finish “Dapping” and separate it from “means”. - Press Escape.
Just as I extends i, A extends a by moving to the end of the line:
- Press
A. - Type
.to finish the sentence. - Press Escape.
| Command | Action |
|---|---|
i |
Insert before the cursor |
I |
Insert before the first nonblank character of the line |
a |
Append after the cursor |
A |
Append at the end of the line |
The uppercase commands act on a larger part of the line. We can now move around a line efficiently; next, let's open new lines. Press o, for “open”, to create a line below the current one and start typing:
- Press
o. - Type
I'm a rapper. - Press Escape.
It would be better to put this new sentence in a separate paragraph. Press O, uppercase o, then Escape to open an empty line above it.
| Command | Action |
|---|---|
o |
Open a line below |
O |
Open a line above |
Here the uppercase and lowercase forms open lines in opposite directions.
Changing and replacing text
There is another mistake: we wanted “dapper”, not “rapper”. How can we change that one character efficiently? We could position the cursor on r, press i, press Delete, type d, then press Escape. The command s, for “substitute”, saves a step:
- Move the cursor onto
r; from the end of that word,bmoves back to its beginning. - Press
s. - Type
d. - Press Escape.
One saved keystroke may seem unimportant, but these operations repeat throughout the day. Making them quick leaves more attention for the creative and interesting parts of the work. As Linus Torvalds puts it, speed does not merely let you finish sooner; it changes the way you work.
The uppercase command S replaces the entire line:
- Press
S. - Type
Be a sinner. - Press Escape.
| Command | Action |
|---|---|
s |
Delete the current character and enter Insert mode |
S |
Replace the current line |
Could a single-character replacement be even simpler? Yes: r, for “replace”. Move to the first letter of sinner, press r, then d. The word becomes dinner. You are still in Normal mode, so there is no need to press Escape.
Its uppercase counterpart, R, replaces successive characters:
- Move to the
iindinner. - Press
R. - Type
app; the word becomesdapper. - Press Escape.
| Command | Action |
|---|---|
r |
Replace one character |
R |
Replace successive characters |
The resulting text is:
Dapping means being determined about being determined and being passionate about being passionate.

Be a dapper.
That is a lot to take in, but learning the modes is the hardest first step. Once their behaviour becomes familiar, the other Vim features are easier to understand. If switching between modes still feels awkward, work through the examples again whenever you need to. For more detail, read :help inserting and :help replacing.
Visual mode
Suppose you want to select several words and replace them with new text. You could click at the start, hold the mouse button and drag to the end. You could also delete the characters one at a time with Delete or Backspace, though that would take even more work.
A more efficient method is to place the cursor at the start, press v to enter Visual mode, then move to the end with arrow keys or a motion command. For example, 5e moves to the end of the fifth word from the cursor. Press c, for “change”, to replace the selection. This command enters Insert mode; press Escape after entering the new text.
Lowercase v selects characters. Use uppercase V to select whole lines.
Switching modes
Normal -- i,I,a,A,o,O,s,S,R --> Insert
Normal <------ Escape ------- Insert
  |  ^
 v,V | Escape
  v  |
 Visual
(r replaces one character without leaving Normal mode.)
The diagram was drawn in Vim with Dr. Chip's DrawIt plugin. Read :help vim-modes-intro for the modes and :help mode-switching for transitions between them. If you are still unconvinced that modes account for Vim's power and simplicity, the articles “Why Vi” and “The Vi Input Model” explain the editing approach in more detail.
Additional cheat sheet
~/.vimrc |
Vim configuration file |
:e scp://user@host/path/to/the/file.txt |
Edit a remote file; netrw also supports ftp and ftps |
:Ex or :e ./ |
Open the file browser |
hjkl |
Move in four directions |
i |
Enter Insert mode |
I |
Insert before the first nonblank character |
a |
Append after the cursor |
A |
Append at the end of the line |
o |
Open a line below |
O |
Open a line above |
R |
Overwrite existing text |
u, :undo |
Undo |
Ctrl-R, :redo |
Redo |
dd |
Cut the line |
cc |
Delete the line and start inserting |
yy |
Copy the line |
p |
Put from a register |
ndd |
Delete n lines |
nyy |
Copy n lines |
Escape |
Return to Normal mode |
Delete |
Delete the character under the cursor |
:n |
Go to line n |
% |
Go to the matching bracket |
:e fname |
Edit a file |
:w [fname] |
Save changes |
:wa |
Save all modified files |
:q |
Quit the editor |
:q! |
Quit without saving |
:colorscheme name |
Choose a colour scheme; a Vim 7.2 installation may store schemes in /usr/local/share/vim/vim72/colors/*.vim |
:pwd |
Show the current directory |
:cd path |
Change directory |
:!cmd |
Run an external command |
Ctrl-P, Ctrl-N |
Complete text in Insert mode |
Ctrl-R, =, expr, Enter |
Insert the result of an expression in Insert mode, such as 5*2-3 |
Syntax highlighting
:syntax on |
Enable highlighting |
:syntax off |
Disable highlighting |
Line wrapping
:set wrap |
Enable display wrapping |
:set nowrap |
Disable display wrapping |
Printing
:hardcopy |
Print the document |
:set printoptions=duplex:off |
Disable duplex printing |
Folding
zc |
Close a fold |
zo |
Open a fold |
zM |
Close all folds |
zR |
Open all folds |
za |
Toggle a fold |
zf |
Create a manual fold |
:set foldenable |
Enable folding |
:set foldmethod=syntax |
Fold by syntax |
:set foldmethod=indent |
Fold by indentation |
:set foldmethod=manual |
Select a region with v and press zf |
:set foldmethod=marker |
Fold by markers in the text |
:set foldmarker=begin,end |
Set opening and closing markers |
Marks
ma |
Set local mark a |
mB |
Set global mark B |
`c |
Jump to the exact position of mark c |
`0 |
Return to the position at the last exit from Vim |
:marks |
List marks |
Registers
"ayy |
Copy a line into register a |
"bdd |
Cut a line into register b |
"C3dd |
Cut three lines and append to register c |
:reg [names] |
Show register contents |
Selection
v, hjkl |
Select text |
V |
Select lines |
Ctrl-V |
Select a rectangular block |
p |
Put |
y |
Copy |
d |
Delete |
gu |
Convert text to lowercase |
gU |
Convert text to uppercase |
Indentation
[count]> |
Shift the selection right |
[count]< |
Shift the selection left |
[count]>> |
Shift lines right |
[count]<< |
Shift lines left |
:set tabstop=n |
Tab display width in spaces |
:set shiftwidth=n |
Indentation step width |
:set expandtab / :set noexpandtab |
Whether to insert spaces instead of tabs |
Search and replace
/pattern |
Find a pattern |
n |
Next match |
N |
Previous match |
:%s/foo/bar/gi |
Replace all foo with bar, ignoring case; details: http://eax.me/regular-expr/ |
Line numbers
:set number |
Show line numbers |
:set nonumber |
Hide line numbers |
Tabs
:tabnew [fname] |
Open a new tab |
:tabs |
List tabs |
:tabn |
Next tab |
:tabp |
Previous tab |
ngt |
Go to tab n |
gt |
Next tab |
gT |
Previous tab |
Windows
:split |
Split horizontally |
:vsplit |
Split vertically |
Ctrl-W, c |
Close the window |
Ctrl-W, = |
Equalise window sizes |
Ctrl-W, h/j/k/l |
Move between windows; arrow keys also work |
Spell checking
:setlocal spell spelllang=ru,en |
Enable Russian and English spell checking |
|
|
:set spell! |
Toggle spell checking |
]s |
Next misspelled word |
[s |
Previous misspelled word |
zg |
Add the word to the dictionary |
zw |
Mark the word as incorrect |
zG |
Accept the word for this session |
Encodings
:e ++enc=encoding |
Open a file using the given encoding |
:w ++enc=encoding |
Save using a new encoding |
:set fileencodings=utf-8,koi8-r |
Encodings to try, in order of preference |
Other commands
:set wildmenu / :set nowildmenu |
Show command-line completion choices |
:set list |
Display tabs and line endings |
q: |
Open command history |
. |
Repeat the last change |
That is all for now. I expect to update this cheat sheet from time to time, so watch for a PS at the end of later posts.